
The elegant free-standing bath has grown in popularity in spacious Australian bathrooms, but until recently, has come with its challenges.
For plumbers and builders, measurements must be perfect with no room for error and are time consuming to install, while chunky bath fillers or damage-prone floor-mounted spouts can be a nightmare for homeowners.
Smartfill is a new bath system by Seima with a spout built into the bath and patent engineering which gives designers and installers the unique ability to select the placement of a bath without the constraints of a floor or wall spout.
The compact and stylish system is compatible with most Seima freestanding baths, offering plenty of options when it comes to size, shape and colour to complement any bathroom.
Seima’s Managing Director, Jim Segredos, says Smartfill is a gamechanger for freestanding baths.
“The key point about Smartfill is that it really changes the face of bathroom design.” Jim says.
“It gives designers and consumers the freedom to design bathrooms in any way, without having to fit the bath along a wall – with Smartfill, they can put the bath anywhere.
“The primary benefit is design flexibility, but it also means that baths can be filled in a way that is unobtrusive and safe – it’s reinventing bathroom design.”
So, for those charged with the responsibility of installing a Smartfill bath filler into a new home or renovation, here are some simple steps to consider prior to and during installation.
Plumbing Planning
The Smartfill system only requires the plumbing to be placed within the bath footprint, however, some planning is necessary.
To complete installation, the following items must be installed under the planned location for the bath with sufficient clearance for connection pipes:
- Water Inlet Point: ½” BSP nipple should protrude a minimum of 30mm above finished floor level. This water point will be controlled via a wall mixer or other tapware, to fill the bath.
- DWV Bath Sewer Point: The recommended distance between the Water Inlet Point and DWV Point is around 200mm, but this is not essential.
The bath will be supplied with the Smartfill head and connecting hoses pre-installed. The stainless steel braided water inlet hose and DN32 overflow hose will be visible under the bath.
The Smartfill system must be installed by a licensed plumber in accordance with Australian Standard AS3500 and meet all the requirements of local licensing authorities.
StarConnect Bath Waste Connector
The StarConnect Bath Waste Connector delivers next-level flexibility, with only a tiny 75mm profile under the bath and the option of multi-directional input and output to place the bath in any position.
To begin the installation, face the open StarConnect spigot towards the location of the floor waste and then determine which of the three StarConnect spigots is the most appropriate to connect to the overflow.
You then simply use a hammer and screwdriver to knock out the chosen spigot to create a custom overflow water path to suit your unique set up.
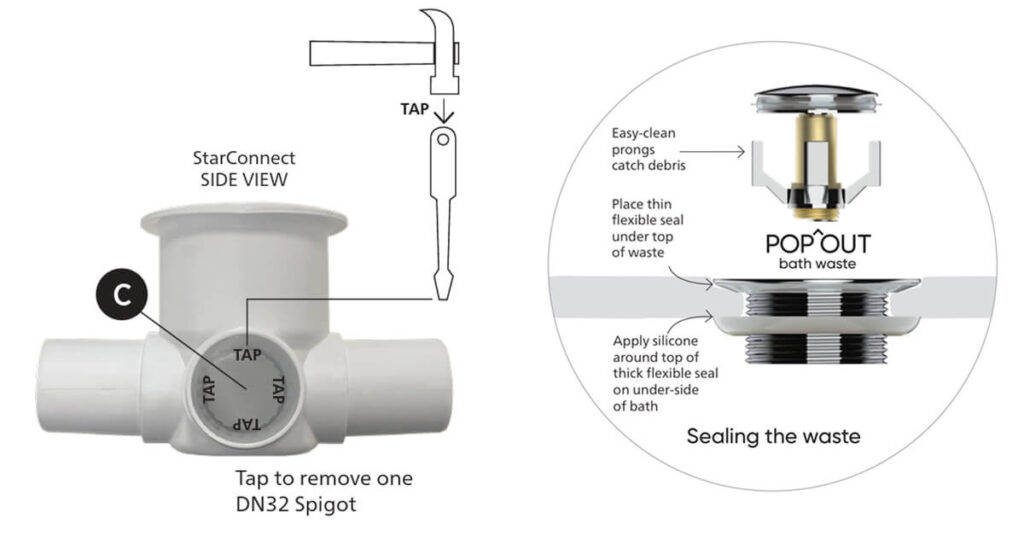
Pop-out Waste
With easy-to-clean prongs which catch all manner of debris, the Pop-Out Basin Waste is a homeowner’s dream.
This Seima patented innovation allows for the top section of the waste to simply pop out, exposing any debris caught on the waste’s prongs and giving clear access to the base of the waste.
The Pop-Out Basin Waste sits within the StarConnect connector and silicone is applied to ensure a watertight seal between the bath, waste and spigot.
The Final Steps
The next stage is to connect the hoses which connect our system to the plumbing.
Once cut to size, the Flexible Overflow Hose and the Flexible Waste Hose are solvent-welded to the StarConnect.
To complete the installation, the bath is connected to the bathroom through the water point that has already been installed under the bath, as well as the floor trap or floor waste.
Perform a final leak test of the whole system before enclosing it, and your bath is ready to go.
This article acts as a guide only, for a complete step-by-step guide please refer to our complete installation instructions here.